Category: Windows

  • Windows 11 Audio Issues? Disabling Audio Enhancements Fixed It on My HP EliteBook

    Windows 11 Audio Issues? Disabling Audio Enhancements Fixed It on My HP EliteBook

    Introduction

    Over the last couple of weeks, I noticed some very strange audio behaviour on my HP EliteBook (2025 model) running Windows 11.

    The sound would randomly switch between stereo and mono, audio quality would fluctuate unexpectedly, and occasional cut-outs would occur during video calls, media playback, and system sounds.

    Initially, I suspected a faulty driver update, Windows patch, or even a hardware issue. However, the system was already running the latest Realtek audio driver available from HP.

    After several troubleshooting attempts, I found a surprisingly simple solution: disabling Windows Audio Enhancements.

    Symptoms

    The issues I observed included:

    • Audio unexpectedly sounding mono instead of stereo.
    • Intermittent sound glitches and dropouts.
    • Inconsistent audio quality between applications.
    • Problems occurring despite having the latest audio drivers installed.
    • The issue affecting both built-in speakers and external audio devices.

    Interestingly, a reboot would sometimes temporarily improve the situation, but the problem would eventually return.

    Environment

    • Device: HP EliteBook (2025)
    • Operating System: Windows 11
    • Audio Chipset: Realtek Audio
    • Driver Version: 6.0.10023.1
    • Driver Date: 28/07/2026

    The Fix

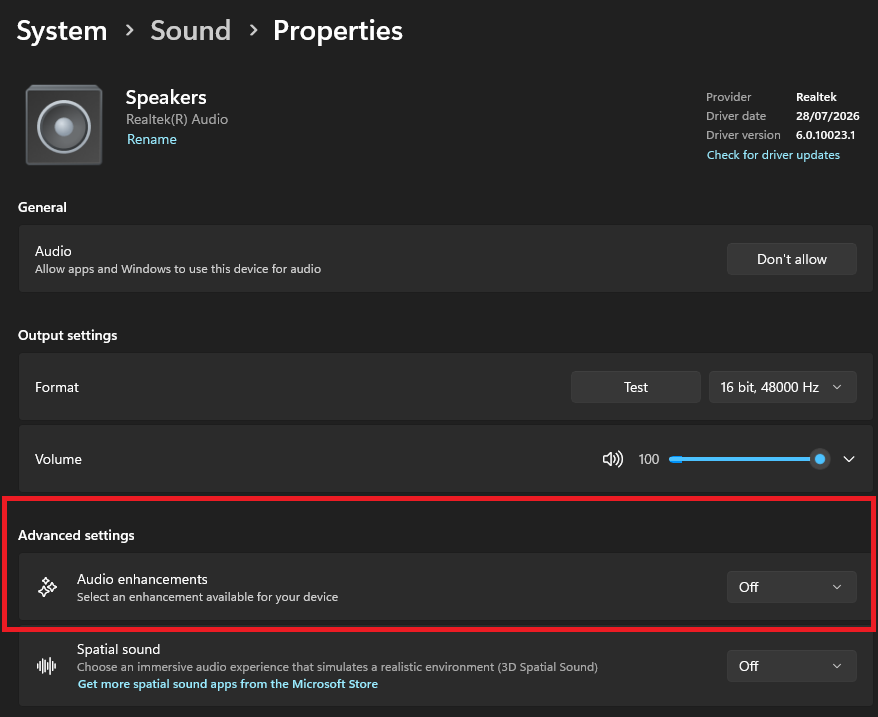
    I navigated to:

    Settings → System → Sound → Speakers → Audio Enhancements

    and changed Audio Enhancements from its default setting to Off.

    After applying the change, the audio problems disappeared immediately.

    The system returned to normal stereo playback and all intermittent glitches stopped occurring.
    Audio Settings

    Why This Can Happen

    Audio Enhancements are software-based processing features designed to improve the listening experience. Depending on the hardware vendor, these enhancements may include:

    • Virtual surround sound
    • Dynamic equalization
    • Loudness normalization
    • Noise reduction
    • Environmental effects

    While these technologies can improve audio in some scenarios, they add an additional processing layer between applications and the audio hardware.

    Following Windows updates, driver updates, or firmware changes, these enhancements can occasionally become unstable, leading to:

    • Audio distortion
    • Channel mapping issues
    • Mono/stereo inconsistencies
    • Increased latency
    • Random audio dropouts

    In my case, disabling the enhancement layer restored stable communication between Windows and the Realtek driver.
  • Change Windows Server 2025 Edition Using DISM

    Change Windows Server 2025 Edition Using DISM

    Need to change a Windows Server 2025 installation to the Standard edition? In some scenarios, such as licensing corrections or deployment mistakes, you may need to switch the installed edition of Windows Server. This can be done directly from the command line using DISM.

    Check the Current Edition

    Before making any changes, verify which edition is currently installed:

    DISM /online /Get-CurrentEdition

    Change to Windows Server Standard

    To convert the server to the Standard edition, run the following command from an elevated Command Prompt or PowerShell window:

    Dism /online /Set-Edition:ServerStandard /ProductKey:XXXXX-XXXXX-XXXXX-XXXXX-XXXXX /AcceptEula

    Restart the Server

    Once the command completes successfully, Windows will prompt for a restart.

    The edition change will be finalized during the restart process.

    Verify the New Edition

    After the server comes back online, confirm that the conversion was successful:

    DISM /online /Get-CurrentEdition

    You can also check the edition from PowerShell:

    Get-ComputerInfo | Select-Object WindowsProductName

    Things to Know

    • Always ensure you have a valid license for the target edition.
    • A reboot is required to complete the conversion.
    • Not all edition changes are supported. Use Get-TargetEditions first to verify available conversion paths.
    • It is recommended to perform a backup or snapshot before making licensing changes on production servers.

    Conclusion

    DISM provides a straightforward way to change the Windows Server edition without reinstalling the operating system. By using the Set-Edition command and a valid product key, you can quickly convert a Windows Server 2025 installation to the Standard edition and complete the process with a single reboot.

  • BitLocker Encryption Not Starting on Surface Pro 9? Check WinRE Configuration

    BitLocker Encryption Not Starting on Surface Pro 9? Check WinRE Configuration

    Introduction

    When deploying a Microsoft Surface Pro 9, you may encounter a situation where BitLocker encryption does not start automatically, even though the device is correctly joined to the organization and all standard BitLocker requirements appear to be met.

    A common cause is that the Windows Recovery Environment (WinRE) is disabled or not properly configured. Without WinRE, Windows cannot proceed with automatic device encryption and BitLocker remains inactive.

    This article explains how to identify the issue and how to resolve it.

    Symptoms

    You may notice one or more of the following symptoms:

    • BitLocker encryption does not start automatically.
    • The device remains unencrypted several minutes after deployment.
    • No recovery key is uploaded to Microsoft Entra ID.
    • The BitLocker status shows encryption as pending or inactive.

    How to Verify the Cause

    Open Event Viewer and navigate to:

    Applications and Services Logs
    
    └─ Microsoft
     └─ Windows
      └─ BitLocker-API
       └─ Management

    If WinRE is not configured correctly, you may find an event similar to the following:

    Failed to enable Silent Encryption.
    WinRE is not configured.
    
    Error:
    This PC cannot support device encryption because WinRE is not properly configured.

    Resolution

    Open an elevated Command Prompt (Run as Administrator) and execute:

    reagentc /enable

    If the command succeeds, you should receive a confirmation similar to:

    REAGENTC.EXE: Operation Successful

    Verify WinRE Status

    You can confirm that WinRE has been enabled by running:

    reagentc /info

    A correctly configured system should display:

    Windows RE status: Enabled

    What Happens Next?

    After enabling WinRE:

    1. Wait a few minutes.
    2. Windows should automatically retry the device encryption process.
    3. BitLocker encryption should begin without requiring any further action.

    You can verify the encryption status by running:

    manage-bde -status

    Conclusion

    If BitLocker encryption is not starting on a Surface Pro 9, the issue may not be related to TPM, Intune policies, or Microsoft Entra ID. In some cases, the root cause is simply that Windows Recovery Environment (WinRE) is disabled.